How to increase C drive space in Windows Server 2016
The same with other server OS, after running Windows Server 2016 for a period of time, C drive is running out of space. Because many types of and large amount of files are saving to C drive continuously. To keep the server running smoothly, you’d better fix this issue ASAP. Otherwise, the server may be stuck or even crash. Many people ask if it’s possible to increase C drive free space in Windows 2016 server without losing data or starting over. The answer is yes. To increase C drive space in Windows Server 2016, there are two options by cleaning up C drive and moving free space from other partitions.
Option 1: Increase C drive space by cleaning up disk
Windows Server 2016 has built-in Disk Cleanup utility to help free up disk space. By using this tool, you can delete unnecessary and junk files to reclaim disk space, so the free space in C drive will be increased. This is especially useful to the server that never cleaned up C: drive. To free up space, I always suggest Windows Cleanup, because it is safe and able to clean many types of junk files. If you are not familiar with Windows associated files, do not delete files manually.
How to increase C drive free space in Server 2016 with Disk Cleanup:
- Press Windows + R keys together, type cleanmgr and press Enter.
- Select C: drive in the drop-down box and click OK.
- In next window, select the files that you want to remove.
- Confirm the deleting operation.
- Repeat from step 1 and click “Clean up system file” in step 3.
If you cannot reclaim over 20GB free disk space, you’d better continue option 2. Because these free space will be eaten up again shortly, you’d better increase C drive disk space by adding more from other partitions.
Option 2: Add more free space from other partitions
First of all, open Windows Disk Management and check if there’s plenty of free space on the same disk. If yes, follow the steps below, otherwise, clone disk to a larger one and extend C drive with extra disk space. Note that no software can add space from another separate disk.
To increase C drive space in Windows Server 2016, there are also 2 kinds of tools – Windows native Disk Management and third party software.
Increase free space with Disk Management
Windows Server 2016 built-in Disk Management tool has the ability to shrink and extend volume. However, it only works by deleting the contiguous D drive to get adjacent unallocated space. It cannot extend a volume by shrinking another one. If you don’t want to delete any partition, jump to the next section.
Note: make sure D drive is primary if you can delete it. If it is logcal drive, the method below is invalid.
How to increase C drive space in Server 2016 by deleting other volume:
- Press Windows + X keys to open Disk Management.
- Right click the contiguous partition D (or E) and select Delete Volume.
- Right-click C drive and select Extend Volume.
- Click Next to continue the Extend Volume Wizard.
- Select the available Unallocated space and click Next.
- Confirm the operation and click “Finish” to proceed.
Caution: make sure no programs or Windows services running from the contiguous partition. Remember to transfer files before deleting.
Increase space with safe partition software
Better than Disk Management, disk partition software can make unallocated space on the left when shrinking partition. C drive can be extended easily with this adjacent unallocated space. In this way, Operating system, programs and anything else keep the same with before. However, remember to back up in advance and run safe partition software. Because there’s potential system damage and data loss risk with unreliable tool.
Better than other software, NIUBI Partition Editor has Virtual Mode, Cancel-at-will, 1-Second Rollback and Hot Clone technologies to protect your system and data. In addition, its advanced file-moving algorithm helps accomplish this take much faster.
How to increase C drive space in Windows Server 2016 without losing data:
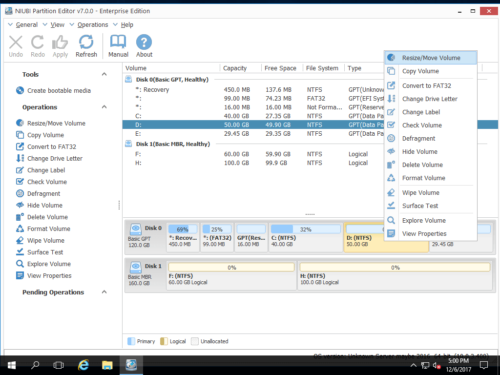
Step 1. Download and install NIUBI Partition Editor, right click the contiguous partition D and select “Resize/Move Volume“.
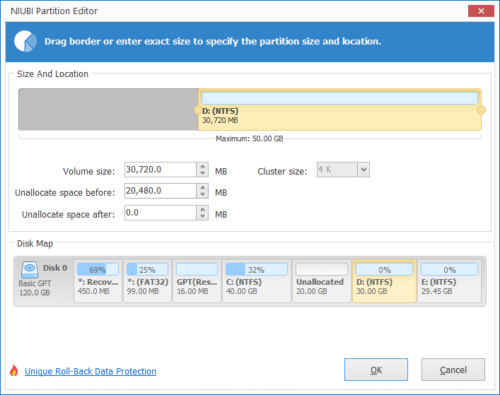
Step 2: Drag left border rightwards to shrink D and release free space on the left.

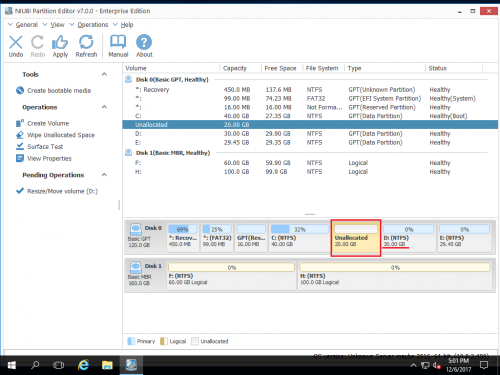
The Unallocated space is made behind C: drive.
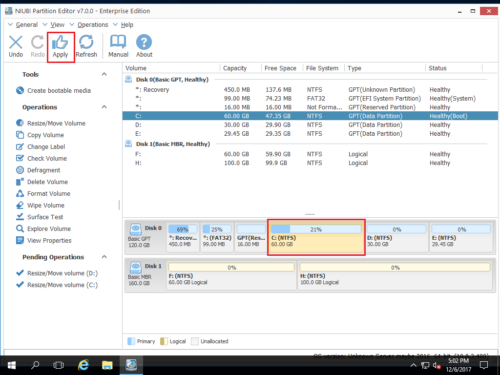
Step 3: Right click C drive and select “Resize/Move Volume” again. In the pop-up window, drag the right border rightwards to combine this Unallocated space.

Step 4: Click Apply on top left to execute, done. (All operations only work in virtual mode in advance, real disk partition won’t be changed until click Apply to take effect.)
Besides decreasing and increasing partition size in Windows Server 2016/2019/2022/2012/2008/2003, this software helps you do many other disk partition management operations.


